Microsoft 365 Installation Instructions
Minimum Version
This DEX Pack requires SysTrack version 10.1 or higher.
Notes
-
After this DEX Pack is installed, it may take up to 24 hours for data to appear.
-
If anonymization is enabled on the tenant, the data will not display in the dashboard.
Import Kit
To use this DEX Pack, the corresponding Kit must be imported to SysTrack.
If you have already imported the DEX Pack directly from the Kits page, the Import Kit step is complete. You may move on to the next step.
If you are viewing this DEX Pack in the Customer Gateway, follow these steps to import this DEX Pack Kit:
-
On the DEX Pack page, download the DEX Pack ZIP file.
-
In SysTrack, open Kits.
-
Under Local, click Select Kit File.
-
Select the DEX Pack ZIP File.
Settings in SysTrack Configure
To use this DEX Pack, you must also update some settings in SysTrack Configure. Follow these steps to find the settings:
-
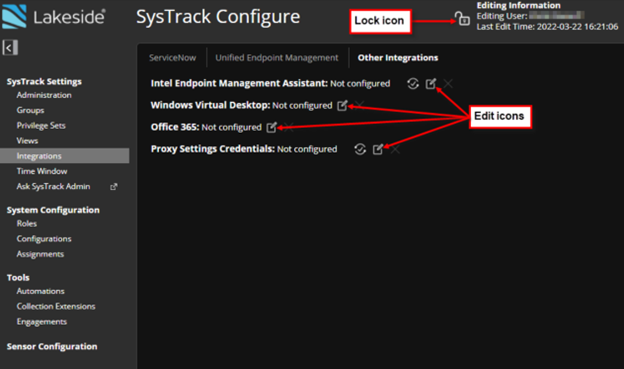
Make sure that you are signed in as a user with rights to modify settings in SysTrack Configure.
-
Select Integrations from the left menu.
-
Select the Lock icon in the upper right so that you can edit the page.
-
Select the Other Integrations tab, and select the Edit icon next to Office 365.
-
The following section explains how to configure the correct settings, along with the settings in Office 365.
Configure This DEX Pack and Integration
Follow the steps below to configure this DEX Pack and the necessary setting in SysTrack Configure.
SysTrack dashboards have a wide range of data sources. These dashboards are a result of custom collection of the Office 365 Graph API.
-
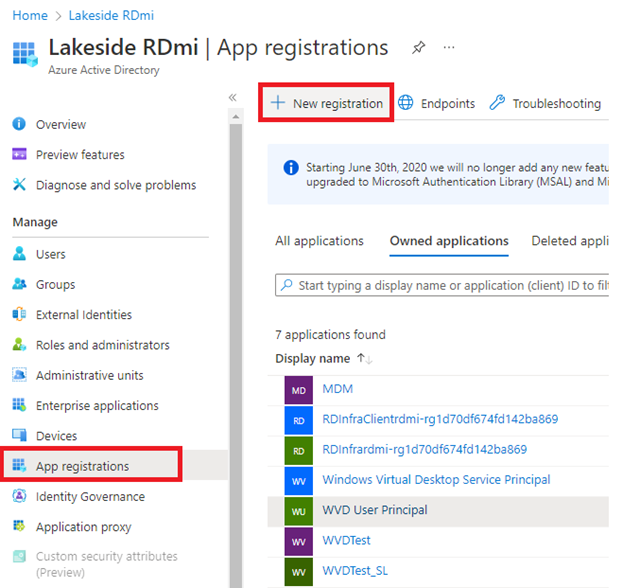
Go to your Azure Portal home page (https://portal.azure.com/#home), and access Microsoft Entra ID.
-
Under the left Manage menu, select App registrations, and then select + New registration.
-
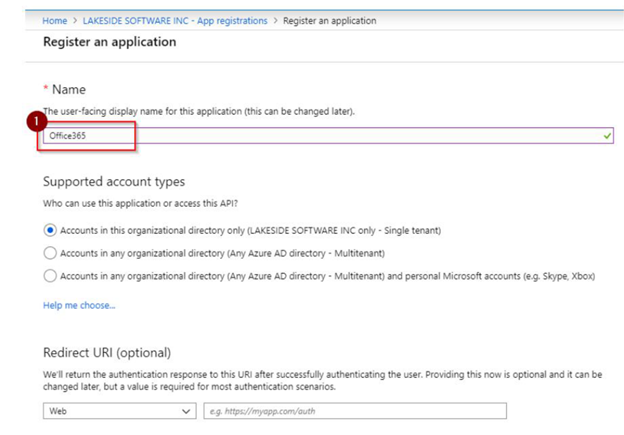
In the Register an application dialog box, enter Office365 in the Name field. Select Accounts in this organizational directory only. Then select Register.
-
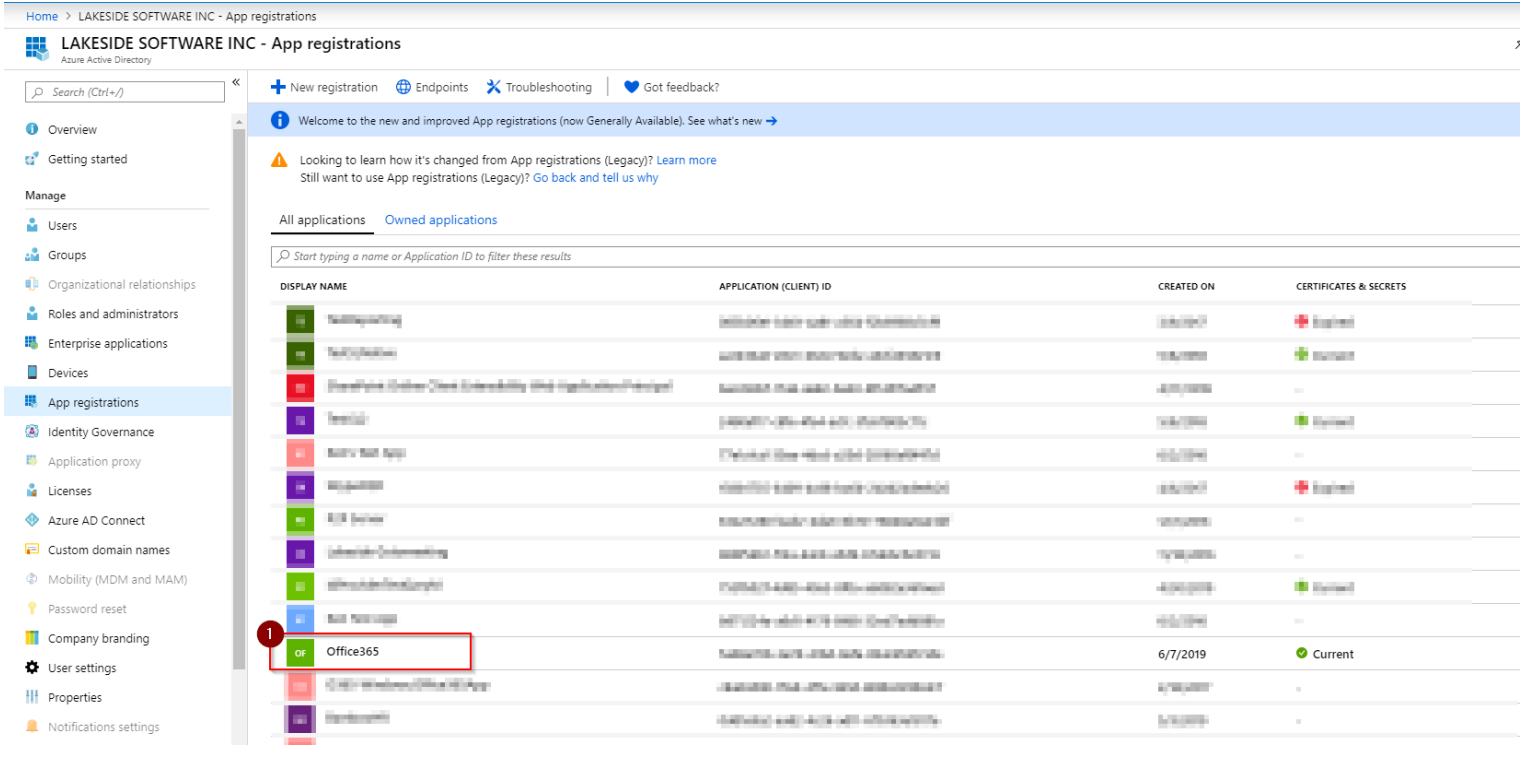
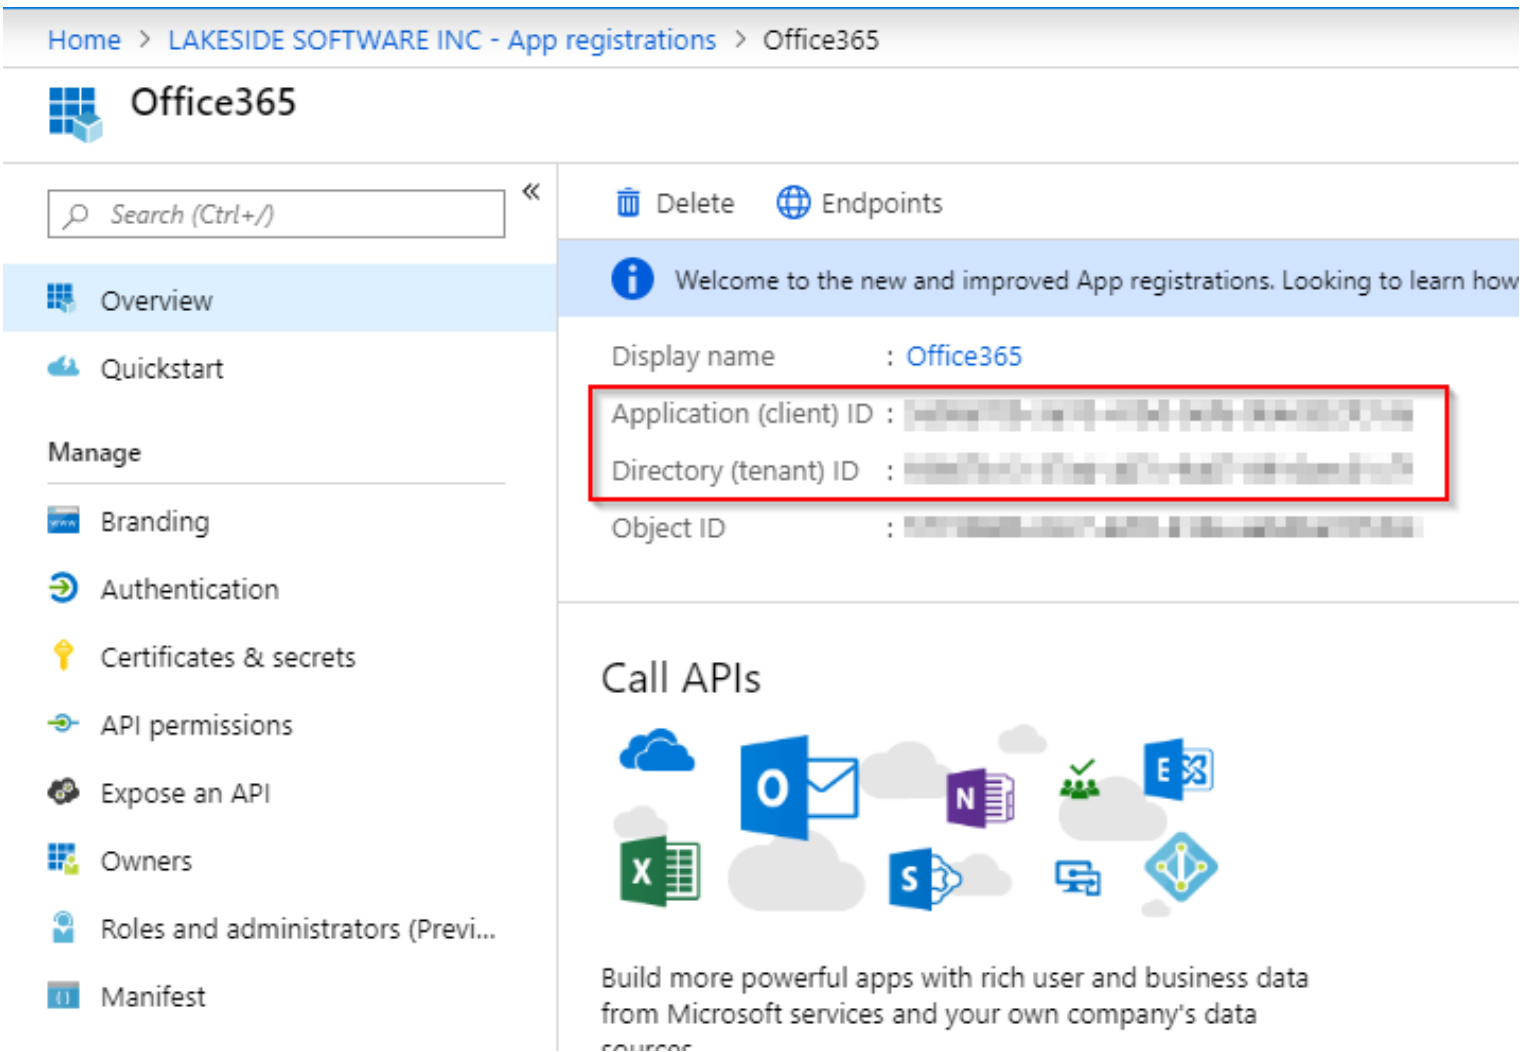
Select your newly created Office365 App Registration.
-
Make a note of the Application (client) ID and Directory (tenant) ID, which will be used later.
-
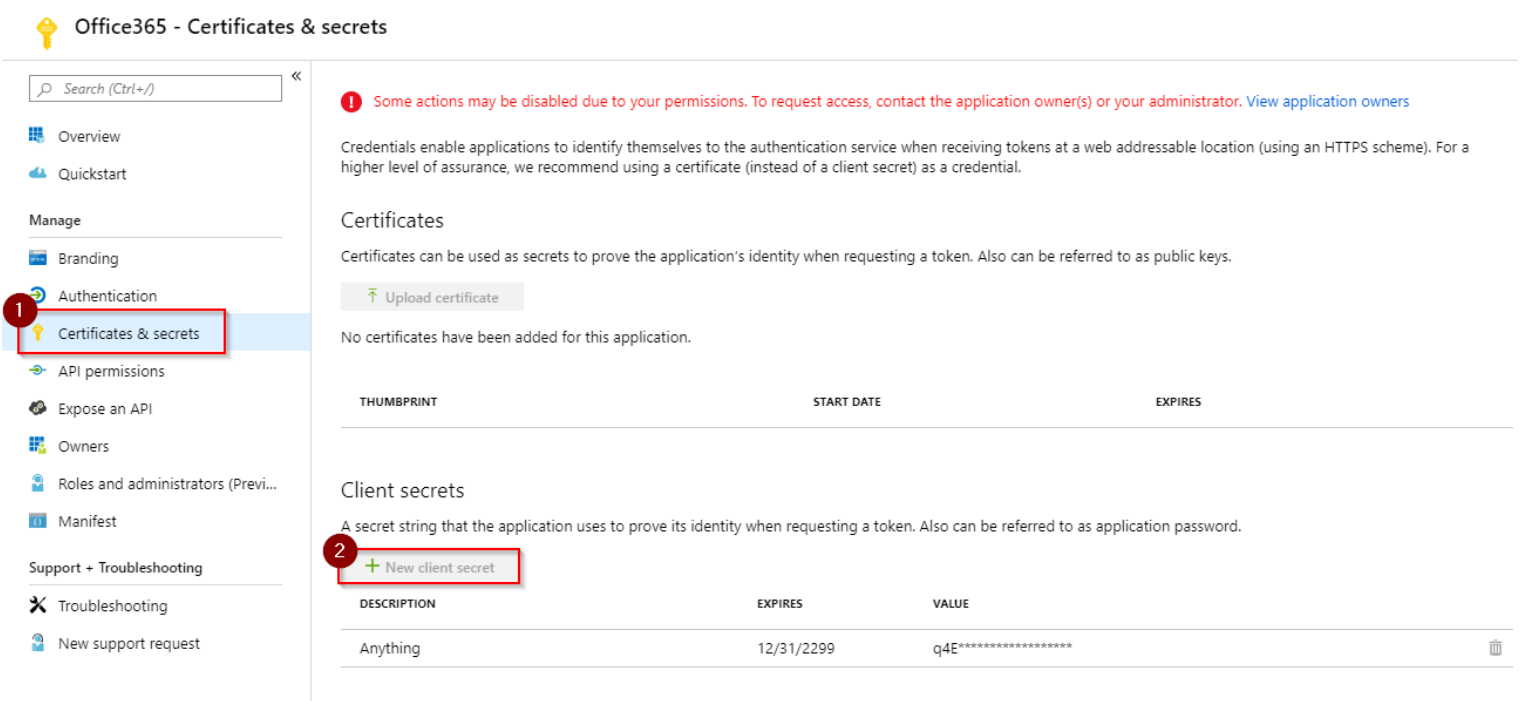
Select Certificates & secrets and add a new client secret.
-
Make a note of the secret VALUE.
IMPORTANT: Be sure to add the secret value to your organization's password management tool so that you do not forget it. You cannot retrieve it after this step.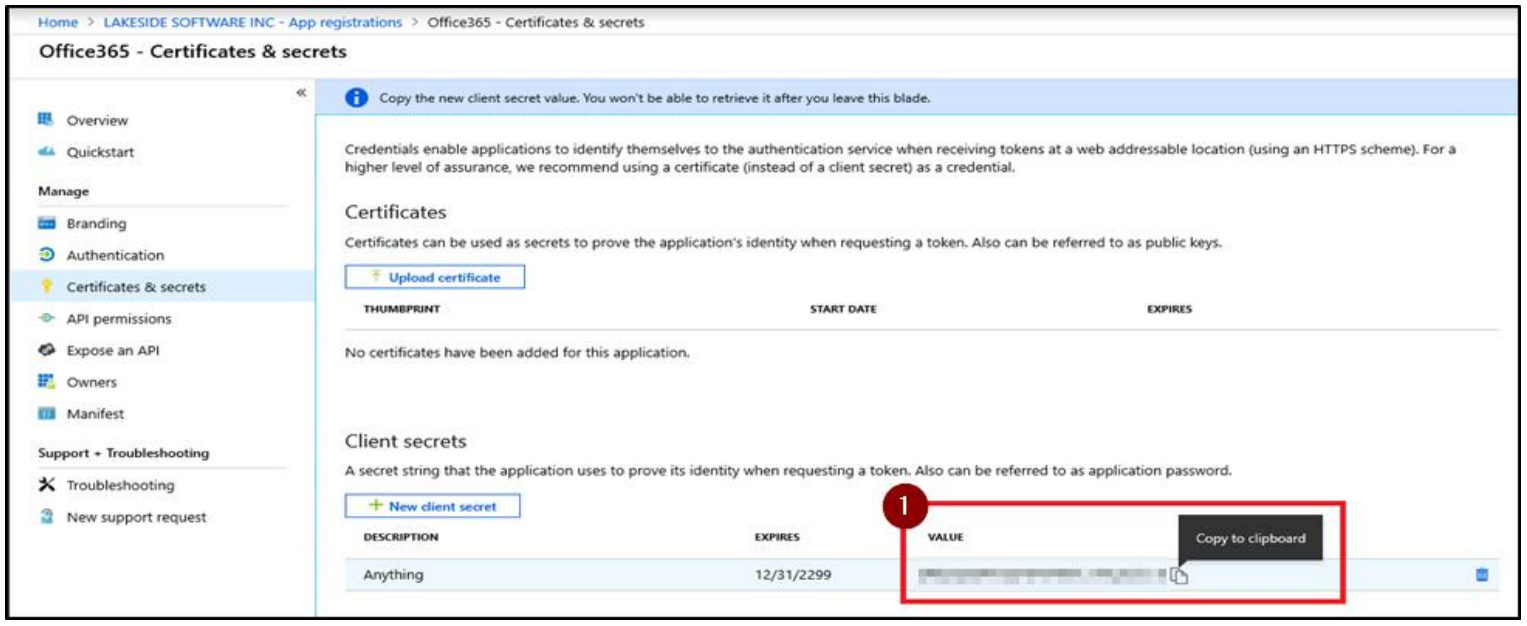
-
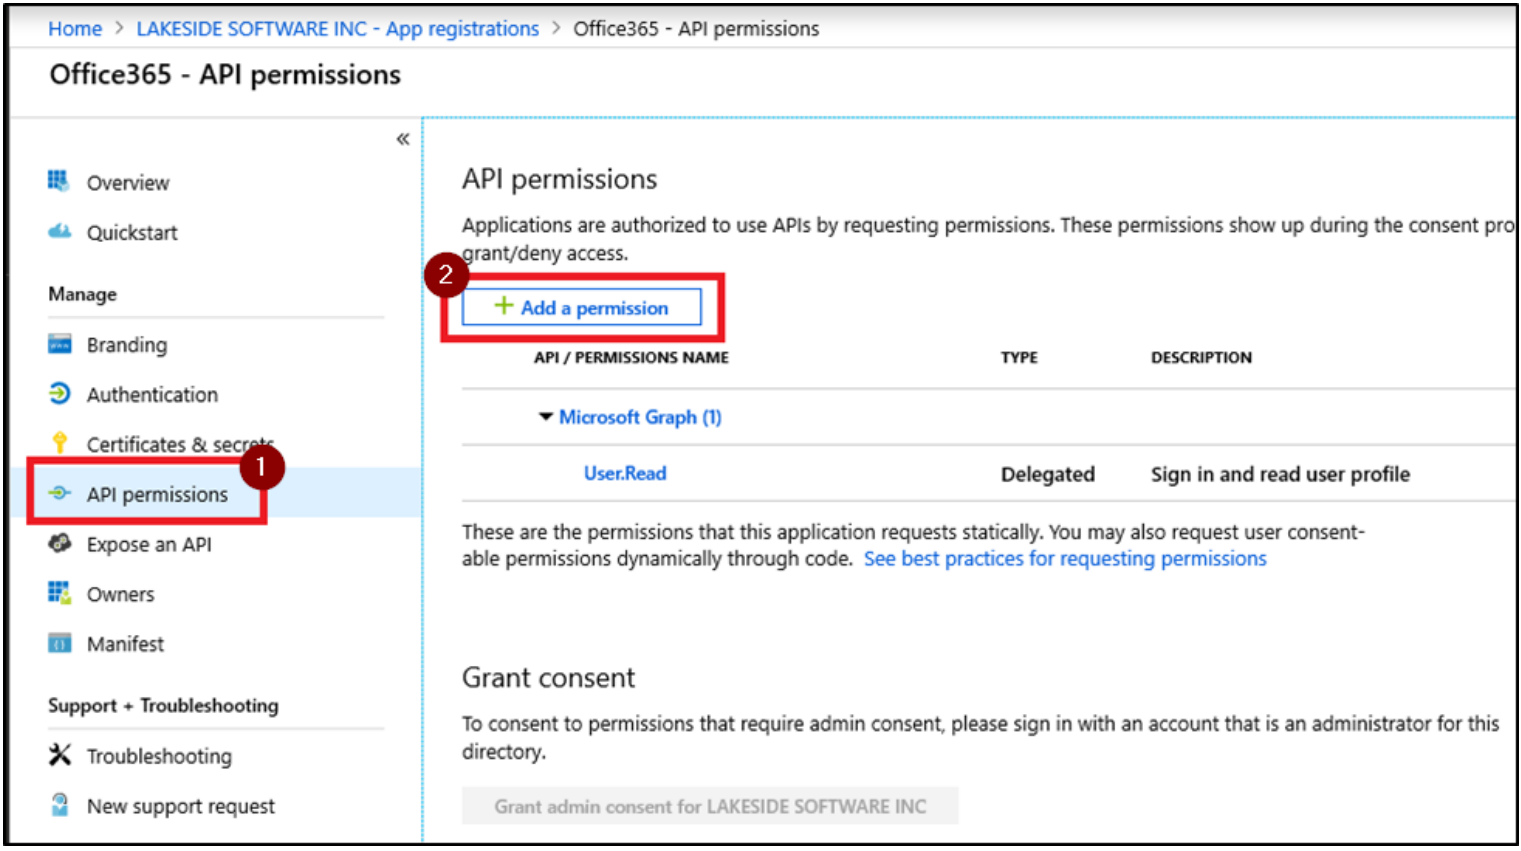
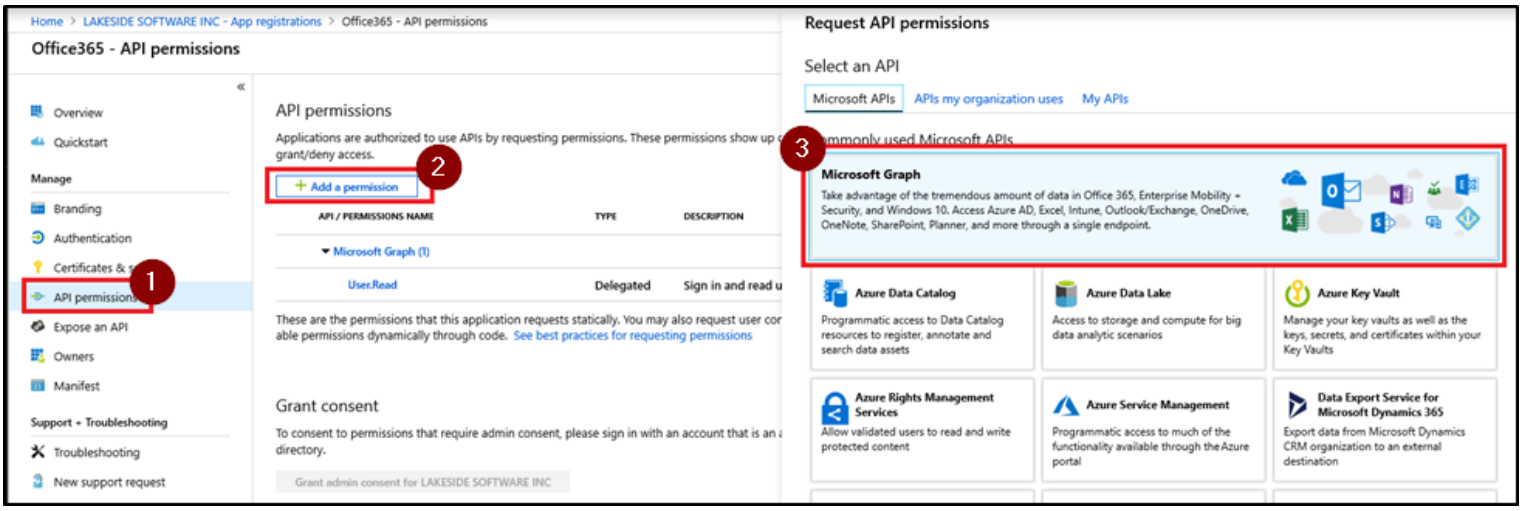
Select API permissions, and then select Add a permission.
-
On the Microsoft APIs tab, select Microsoft Graph.
-
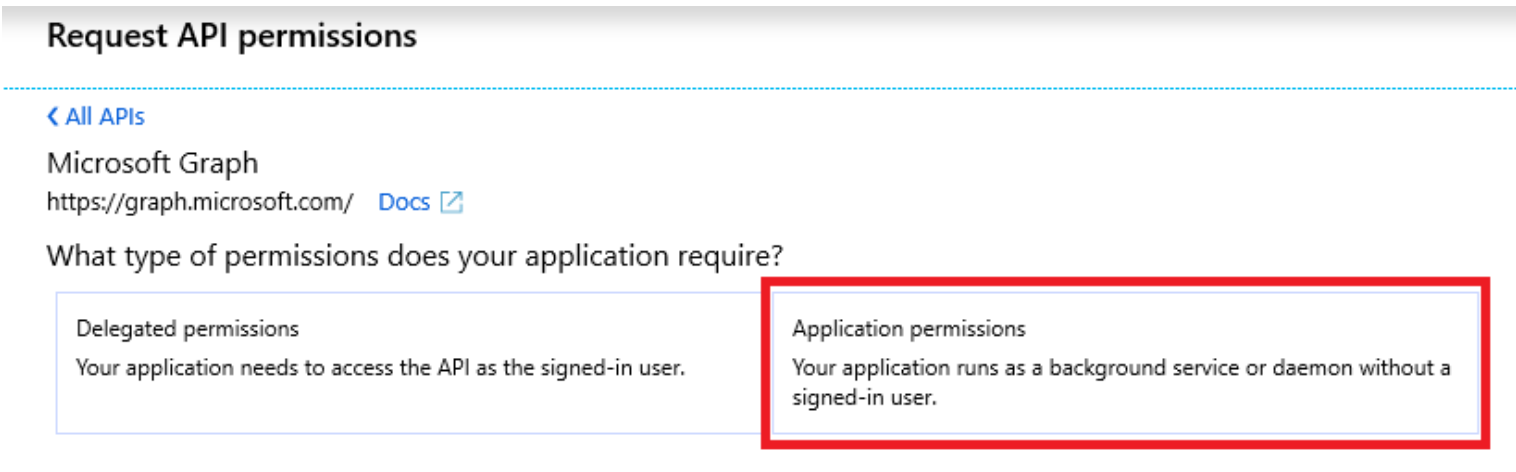
Select Application Permissions.
-
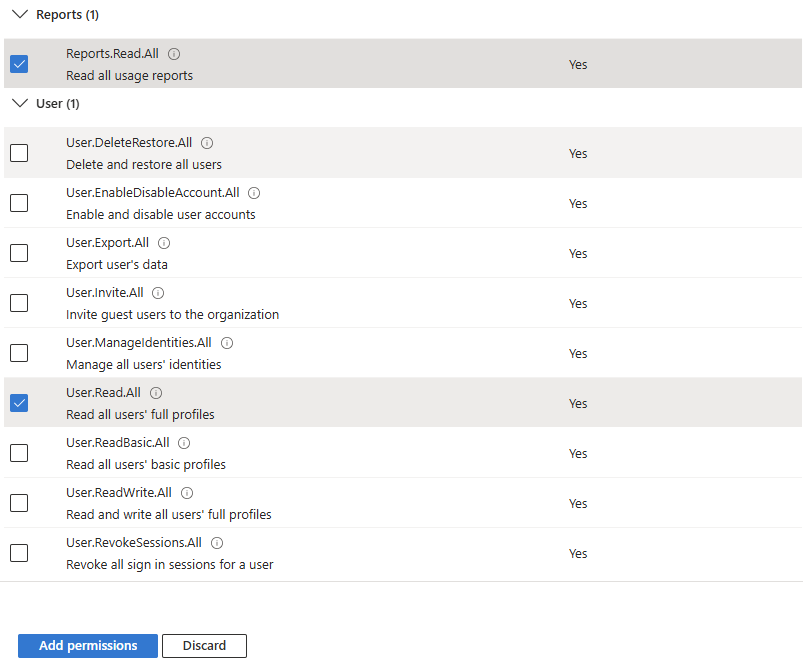
Expand Reports and select Reports.Read.All. Expand User and select User.Read.All. Then select Add Permissions.
NOTE: You need to give permissions for Reports.Read.All because SysTrack uses the Microsoft Graph API reports to pull the data and permissions for User.Read.All. This is necessary to clean up data, because your reports could still have data from people who no longer work at your company and no longer exist in O365 as users.
-
Make sure that you are signed in as a user with rights to modify settings in SysTrack Configure.
-
Select Integrations from the left menu.
-
Select the Lock icon in the upper right so that you can edit the page.
-
Select the Other Integrations tab, select the Edit icon next to Azure Virtual Desktop, and enter the following information:
-
Tenant ID: Enter the Tenant ID from Microsoft Entra ID.
-
Client ID: Enter the Application (client) ID from Microsoft Entra ID.
-
Client Secret: Enter the Client Secret Value from Microsoft Entra ID.
-
Leave the default retention period. Also, enable all collection intervals by selecting all the check boxes to collect daily, weekly, monthly, quarterly, and half year.
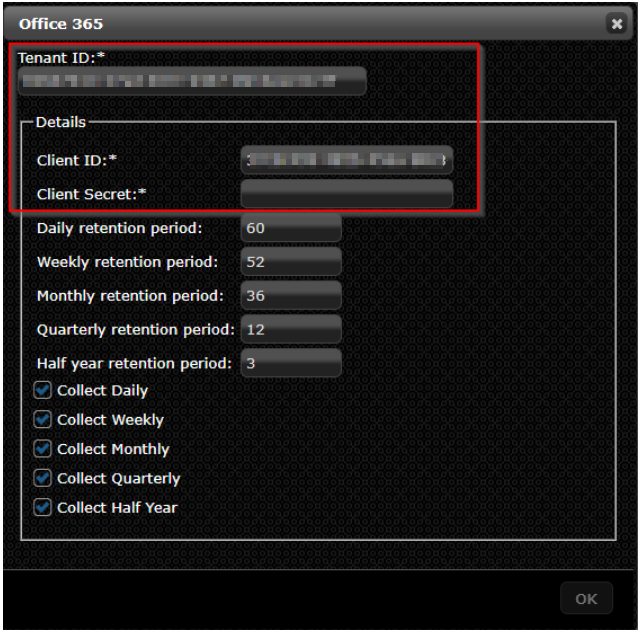
NOTE: You can find the Tenant ID and Client ID information on the app Overview page.
-
-
Select OK, and then select Save Changes.
-
Select the open Lock icon to end your editing session.
The integration for Office 365 data collection is configure and ready to collect data.
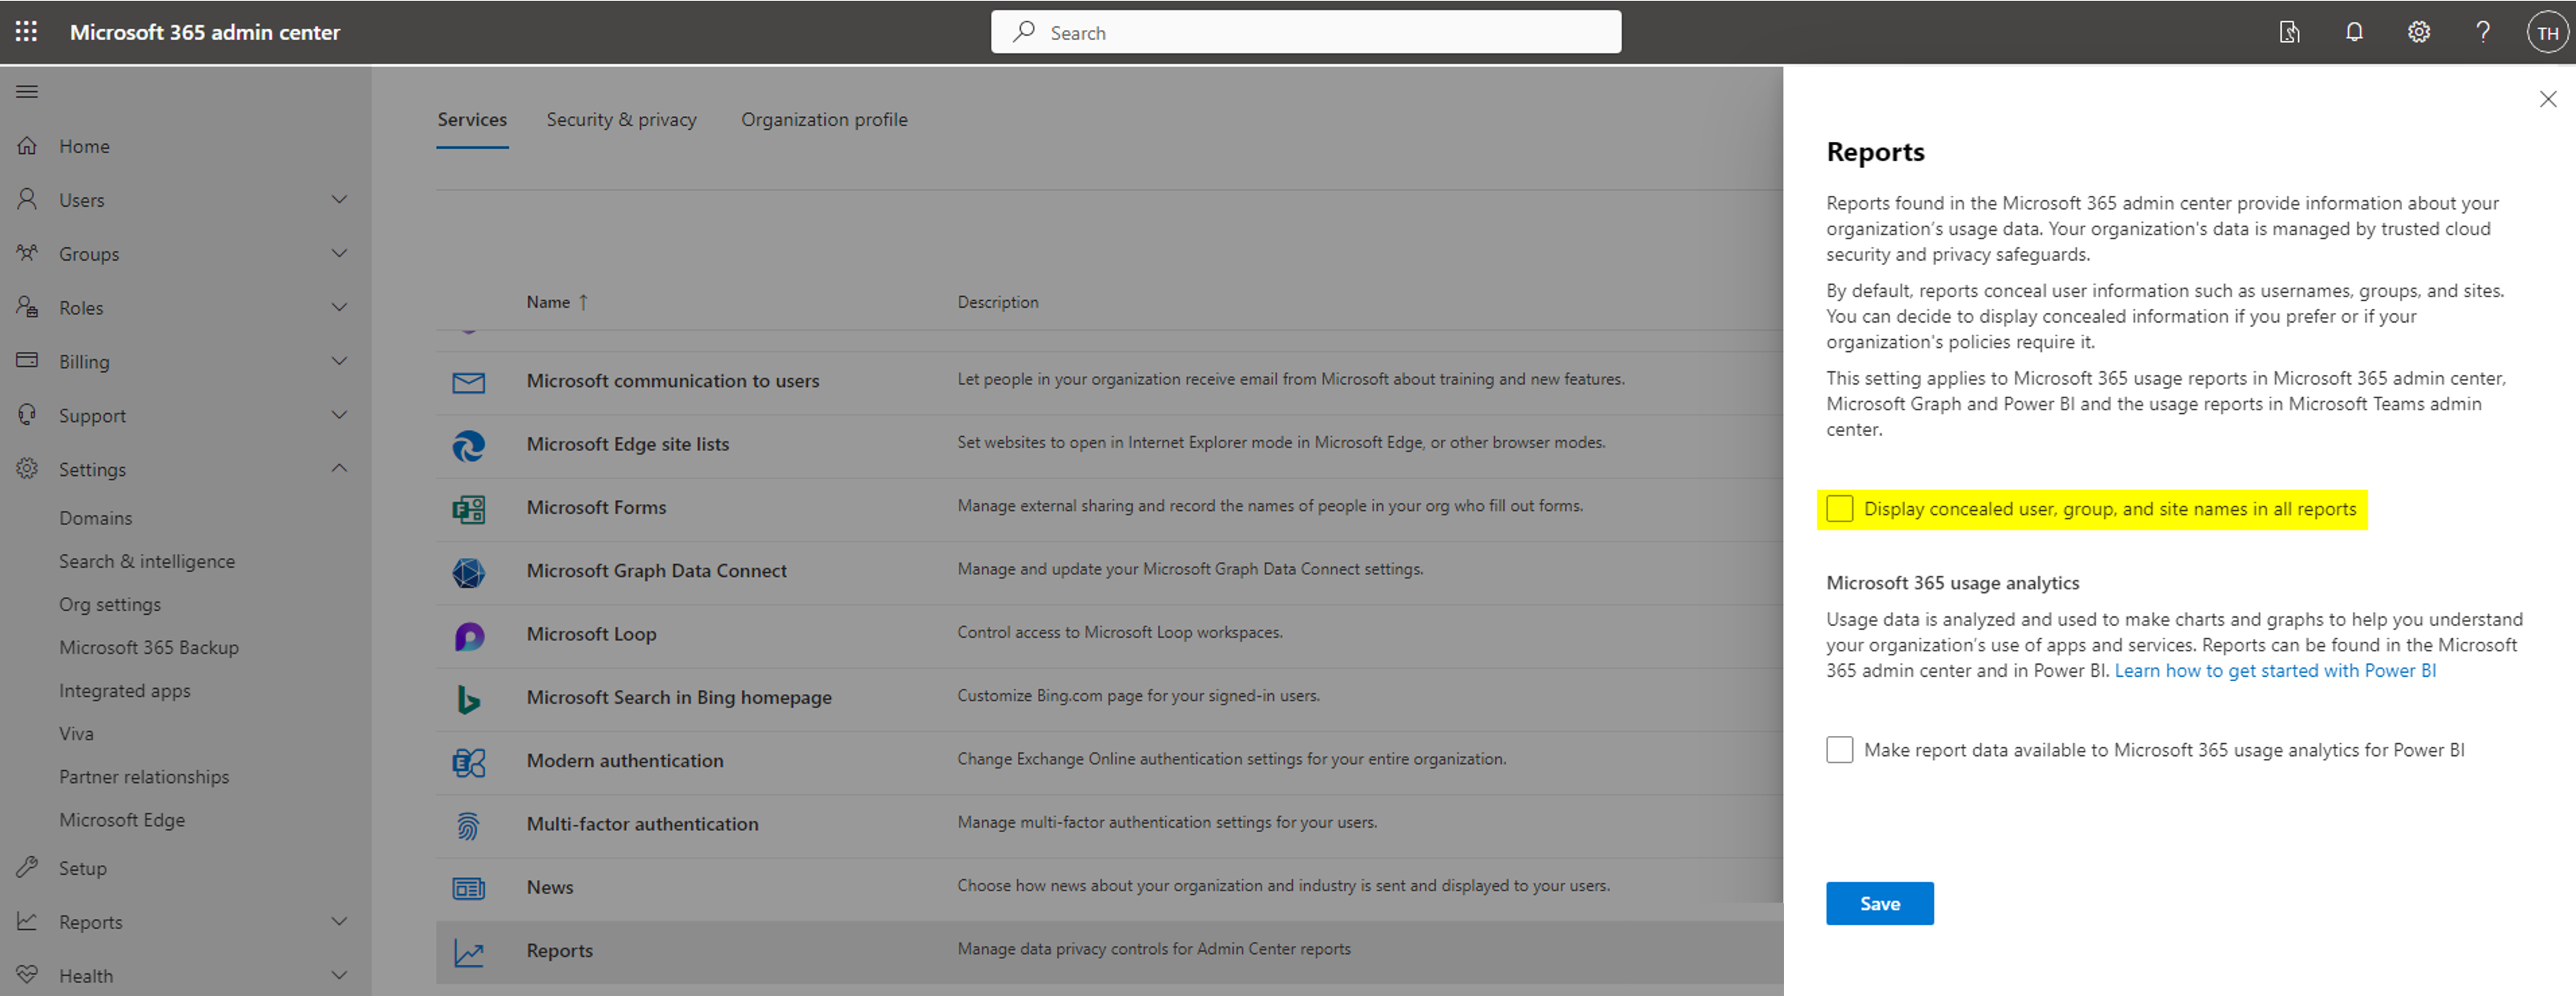
Set User Information to Display
To ensure that names for users, groups, and sites are shown in the data SysTrack collects from this integration, you must follow these steps to edit a setting in Microsoft 365 admin center:
-
Open the Microsoft 365 admin center.
-
Go to the Services page at Settings > Org Settings > Services page.
-
Select Reports.
-
Uncheck the check box for Display concealed user, group, and site names in all reports.
-
Select Save.
TIP: For more information on this setting, see Microsoft's documentation.
On This Page